
// page en cours / documentation in construction //
Autoreplicant is a program that scans all the files on the π-box, and transfer them by audio using minimodem, the packet transfer is routed to the audio output of the pibox, so you can choose to use stream, radio or line out, or all of them together. Another raspberry can use the reception script, listen to the audio, and will be able to duplicate the π-box on this new host.
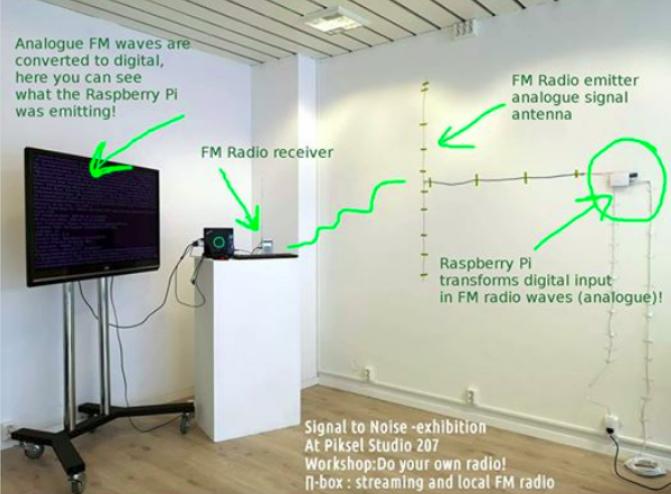
Prerequisites : the installation requires two raspberry pis. One that transmits, and one that receives the packets, and a radio if you transmit through FM.
The transmitter has to be set on a working π-box. If you need to build one, refer to the π-box documentation page.
Then, connect in ssh to the π-box and install minimodem.
$ sudo apt-get install minimodemDownload the transmission scripts here !
transmission.zip
You can put the scripts either via ssh/scp, or copy them directly on the π-box sd card in the /home/pi/
or
create them with nano, and copy paste the content below :
The sending script is to be put at: /home/pi/
$ cd /home/piCreate the script that scans the files and send them to minimodem :
$ nano launchrepicate.sh Copy the script:
#!/bin/bash
######################################################################
# find all files of the os and send 2 minimodem one by one           #
######################################################################
sleep 3
while true
do
        find / -type d \( -path /proc -o -path /sys -o -path /tmp \) -prune -o -exec ./minimodemTXaudio.sh {} +
done
Save and quit the file.
Transform launchrepicate.sh into an executable
sudo chmod +x /home/pi/launchrepicate.sh Create the file called minimodemTXaudio.sh :
nano minimodemTXaudio.shthen copy the following script :
#!/bin/bash
##########################################################################
# minimodemTXaudio pass any type of document to binary and then to Pi audio internal out #
##########################################################################
echo $(basename "$1") |tee /dev/tty1 | minimodem -q -8 --tx --alsa=plughw:0,0 100
sleep 1
cat "$1" | pv -l -L 1 -q |tee /dev/tty1 | minimodem -q -8 --tx --alsa=plughw:0,0 200
exit 0
Save and quit the file.
The command pv allow to read slowly the result of the cat command line by line, tee allow to show on screen - console /dev/tty1 (see which console is used who) and send it to minimodem at the same time
Transform minimodemTXaudio.sh into an executable
sudo chmod +x /home/pi/minimodemTXaudio.sh you have to modify the rc.local file
nano /etc/rc.localthen modify as follow
/usr/bin/python3 /home/pi/pibox_V2/go.py 2> /home/pi/pibox_V2/error_log.txt >/dev/null &

cd /home/pi/
./launchrepicate.sh &

exit 0you have to set up the pibox settings as follows
inputs (with or without internet):
line in
outputs
through a stream, line out, or radio, according to how you want to transmit the signal (over internet, locally on FM, or via a cable)
Connect the minijack cable from the native soundcard of the Raspberry pi (audio output included on the Pi) to the microphone input of the USB external sound card
while connected to the pibox with ssh, type :
$ alsamixerYou will have to put the minimodem sound to the maximum. It uses the native spound card of the raspberry pi.
Then check the pibox external sound card by raising the mic input to the maximum.
after this step the sound shall be audible on the sound medium you chose.
now time to configure the receiver, on you second pibox
download the scripts here!
reception_script.zip
$ sudo apt-get install minimodemthe TX reception script is to put in the directory /home
$ cd /homeCreate the file minimodemRXaudioTXT.sh :
nano minimodemRXaudioTXT.shCopy the script :
#!/bin/bash
######################################################################
# minimodem2fm_rcv.sh receive sound for textfile_name and data       #
######################################################################

minimodem --rx 200 -q -8 --rx-one
#minimodem --rx 200 -8 --rx-one

while true
do
    echo -e "\n"
    minimodem --rx 100 -q -8 --rx-one
#    minimodem --rx 100 -8 --rx-one
#    name="$(cat /tmp/name_textfile.txt)"
    echo -e "\n"

#    minimodem --rx 200 -8 --rx-one
done

while true
do
        echo -e "\n"
        minimodem --rx 100  -8 --rx-one > /tmp/name_textfile.txt
        echo -e "\n"
        minimodem --rx 200  -8 --rx-one > /tmp/name_textfile.txt
done
Save and exit the file (ctrl-X)
Then transform the file in an executable:
sudo chmod +x /home/pi/minimodemRXaudioTXT.shConfigure Zlsa mixer depending on your global set up (with radio ? through a stream ? )
$ alsamixerthen store the alsamixer parameter
$ alsactl storeThen connect the sound output of the sound source (computer, radio) to the input of the receiver
and test the script !
It shall work !